Discover the Ultimate No-Dig Fence Solution: Unveil the Strongest Fence You Can Build Without Digging!
2024/08/13
Report
ADVERTISEMENT
DIY Vinyl Privacy Fence Installation: No-Dig Method
Installing a vinyl privacy fence can significantly enhance the privacy and aesthetics of your outdoor space. For those looking to tackle this project efficiently, the no-dig method is an excellent choice, allowing you to complete the job in a single day without the hassle of traditional digging. Here’s a step-by-step guide to help you successfully install a vinyl privacy fence using this approach.
Preparing for Installation
Before starting, it’s crucial to familiarize yourself with the site and any potential obstacles.
ADVERTISEMENT
Identify the location of utility lines on your property:
Yellow indicates gas lines.Red marks power lines.Orange represents communication lines.
Maintaining a safe distance of at least two feet from these utilities is essential to avoid accidents. In our case, the utilities resemble a tangled mess, so careful planning is necessary to navigate around them.
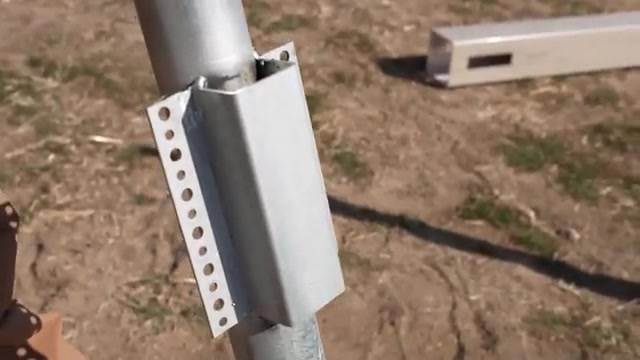
Planning the Layout
To ensure proper placement of your fence posts, begin by marking out the locations where they will go.
ADVERTISEMENT
Use paint or markers to indicate where each post will be installed. The typical spacing for fence posts is around 6 feet apart, but adjustments may be needed based on the length of your fence sections and any obstacles in the way.
The article is not finished. Click on the next page to continue.
ADVERTISEMENT
The article is not finished. Click on the next page to continue.
Next page
No dig Potato Gardening: Expert Tips from Charles Dowding
2024/08/15

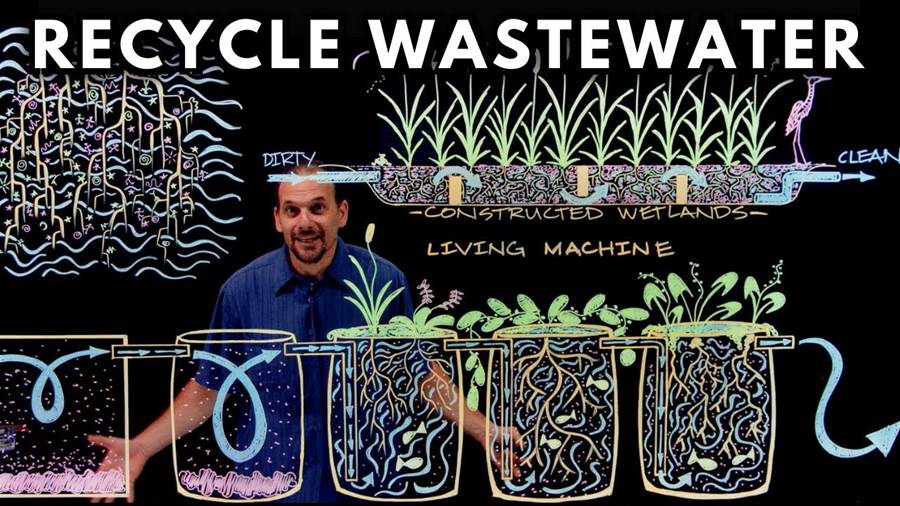
How to Recycle Waste Water Using Plants
2024/08/12
Terrified Pregnant Mama Dog Abandoned On The Street Gave Birth To 14 Beautiful Puppies
2024/10/02

Spider-Man Reimagined: How TASM2 Makes Waves in 2024!
2024/09/29

There's No Spider-Man 2 DLC? Is It Time To Move On?
2024/09/29

💥 Huge Upgrade Alert: Marvel's Spider-Man 2 Gets Fresh Suits and New Features!
2024/09/29

Beneath the Surface: The Hidden Truth of the Enviable Divine Duo
2024/09/29

All-Star Duo or Hidden Rivalry? The Tension Behind Matt and Jen's Philly Swing Performance
2024/09/29

Glenn Ball & Alyssa Glanville - Jack & Jill Champions - The Chicago Classic 2024
2024/09/29

GGP 2023 - J&J CHAMPIONS - Ludovic PELLEGRIN & Glenn BALL - Sponsored by Westy Nantes
2024/09/29

He Was Banished for Having NO Powers... Now He's the Only One Who Can Stop the DEMON KING!
2024/09/29

Things You Never Knew About 'Big Bang Theory' (Including the Star Who Admitted to Hooking Up In Their Dressing Room)
2024/09/28

Young Sheldon Season 6 Video Shows How Harrowing George & Missy’s Ending Really Was....💔
2024/09/28

"It’s Gonna Be Amazing!" Emily Osment Teases Future Collaboration with Haley Joel Osment❤️
2024/09/28

Urgent: Glenn Ball’s Latest Dance Moves Are Taking Over—Don't Miss Out!
2024/09/28

Young Sheldon's Most Divisive Character Returns in Georgie & Mandy Spinoff Promo🔥
2024/09/28

Gary McIntyre, Susan Kirklin, Glenn Ball & Emily Huang - FP NYE 2022 Pro Show
2024/09/28

Léo Lorenzo & Kate Samol Bachata Social Dance XXIX 2023.05.28. Mambo City & LLB & BachataMusketeers
2024/09/28

Léo Lorenzo & Emily Huang - Strictly All-Stars & Champions Finals - Jack&Jill O'Rama 2023
2024/09/28

What Did You Miss? A Stunning Dance Performance That Will Leave You in Awe
2024/09/28

